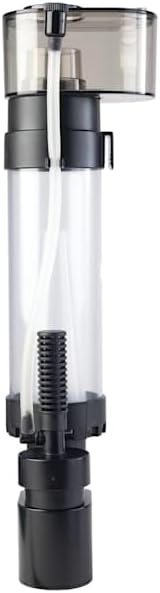
If you just plugged in your first protein skimmer — the device that scrubs dissolved organic waste out of your saltwater before it can break down into ammonia — and it’s either erupting foam everywhere or sitting there doing absolutely nothing, take a breath. Both of those things are supposed to happen. A protein skimmer works by mixing fine air bubbles into aquarium water inside a reaction chamber; organic compounds stick to the bubble surfaces and rise into a collection cup as a dark, smelly concentrated waste called skimmate. The trouble is that a brand-new skimmer hasn’t yet developed the thin biofilm on its internal surfaces that stabilizes bubble behavior, and the impeller (the spinning pump inside) needs time to seat itself and run smoothly. That stabilization window — usually seven to fourteen days — is what the hobby calls “break-in,” and it is the single most misunderstood phase of nano reef ownership. This guide walks you through exactly what to expect, day by day, with concrete adjustments at each stage.
Days 1–3: The Overflow Is Not a Malfunction
The most alarming thing a new nano skimmer can do is blow its collection cup within the first few hours of operation. Reviewers of the Coralife Biocube skimmer describe precisely this scenario — the unit producing so much wet foam in the first hours that it overwhelmed the collection cup entirely before settling into reliable operation later that week. This is not a defect. It is chemistry.
Why it happens: New acrylic and plastic surfaces are slightly hydrophobic and coated with manufacturing residues. The impeller is running against tolerances it hasn’t worn smooth yet, producing irregular, over-sized bubbles. Larger bubbles rise faster and carry more water with them, so the skimmer produces thin, watery, light-colored foam — sometimes called “wet skim” — at very high volume. Add to that any surfactants (soaps or cleaning agents) that may have touched the tank during setup, or the elevated organic load of a system that just received a new batch of live rock, and you have a foam factory.
What to do in the first 72 hours:
-
Raise the collection cup drain or lower the water line inside the skimmer body. Every nano skimmer has an outlet pipe, standpipe, or adjustable neck that controls how high water sits in the reaction chamber. The higher the internal water level, the wetter and more voluminous the foam. Back it off — lower the water level inside the skimmer — until foam is just reaching the cup rather than flooding it.
-
Remove the collection cup and rinse it daily. Wet, thin skimmate still contains organics; it’s just diluted. Keeping the cup clean maintains airflow and reduces the surface tension that drives overflow.
-
Leave it running. Turning the skimmer off and restarting it resets the biofilm clock and often triggers another overflow surge. Continuity matters more than tidiness this week.
Days 4–7: The “Dead Zone” and Why Your Skimmer Seems to Stop Working
Around day four or five, many nano skimmer owners report the opposite problem: the overflow stops, the foam retreats, and the unit appears to be producing nothing. Reef Builders’ coverage of small-format skimmer behavior notes this “dead zone” as a predictable phase in break-in — the impeller has now smoothed out enough that bubble size decreases, but the internal biofilm hasn’t yet developed the surface chemistry needed to stabilize the rising foam column.
This is also when the temptation to crank the water level up to maximum hits hardest. Resist it. If you chase foam production by raising the internal water line all the way, you’ll trigger another wet overflow cycle and restart the clock.
The right adjustment here is patience plus fine-tuning:
- Raise the internal water level by one small increment — typically 2–4mm on most nano adjustment mechanisms — and wait 30 minutes before evaluating. This is the rhythm Advanced Aquarist’s skimmer theory guides describe as “incremental convergence.”
- Check that the air intake on the needle-wheel pump isn’t partially blocked. A partially occluded air line reduces bubble density and is a common cause of mid-break-in slowdowns.
- Wipe the inside of the reaction chamber with a clean paper towel to remove any oily residue that may be suppressing bubble formation. Don’t use soap.
The Tunze 9001 — one of the most consistently praised nano skimmers in aggregated long-run reviews — earns its reputation specifically during this phase. Owners who have worked through multiple cheaper units before landing on the Tunze note that the 9001’s needle-wheel design converges faster through the dead zone than most competitors, often beginning to produce consistent dark skimmate by day five or six.
Days 8–14: Dialing In for Your Specific System
By the second week, the skimmer’s behavior should become readable. Foam rises steadily, the color shifts from pale gray-tan to amber or dark brown (that color shift is the sign organics are actually being captured), and adjustment responses become predictable. Now you’re tuning for your bioload, not fighting break-in chemistry.
By the numbers — typical nano skimmer stabilization window:
| Phase | Days | Foam Character | Correct Response |
|---|---|---|---|
| Overflow surge | 1–3 | Wet, pale, high-volume | Lower water level, clean cup daily |
| Dead zone | 4–7 | Minimal or no production | Small upward increments, patience |
| Convergence | 7–10 | Amber, moderate | Hold current setting 24 hrs before adjusting |
| Stable operation | 10–14 | Dark, low-volume, consistent | Tune to bioload; empty cup 2–3× weekly |
Practical Fishkeeping’s skimmer guide notes that the ideal skimmate in stable operation is described as “dark tea or coffee brown, with a thick consistency” — that color indicates high organic concentration per unit volume, which is exactly what you want. Light, watery skimmate in week two means the water level inside the skimmer is still too high.
IOAOI nano skimmer owners specifically describe the adjustment mechanism as “tricky” even during stable operation — the water level control is sensitive to small movements and can feel non-linear. If you’re running this unit, mark your current setting with a permanent marker before making any adjustment so you can return to baseline if the change destabilizes things.
Reef Octopus 110INT owners, by contrast, frequently report the opposite experience: the unit runs dead-silent from day one and requires almost no active intervention. After a week away (even during vacation), owners return to a full collection cup of dark skimmate — a sign that the design stabilizes quickly and holds calibration well without daily babysitting.
One Scenario Worth Naming: Running a Skimmer During the Cycling Phase
If your tank is brand new and still cycling — meaning the beneficial bacteria that convert ammonia to nitrite to nitrate haven’t yet colonized the system — the question of whether to run the skimmer at all is genuinely contested. The concern is that protein skimming removes some of the dissolved organic compounds that feed the bacterial colony establishing itself in your rock and substrate.
Coral Magazine’s nano reef filtration coverage takes a pragmatic position: run the skimmer at reduced output during cycling (lower water level, accept lower skimmate production) rather than switching it off entirely. Full shutdown delays your break-in clock, and a tank mid-cycle is producing high ammonia loads that benefit from any organic export you can get. Reef2Reef community consensus generally agrees — keep it running, keep it dialed down, accept that skimmate will be minimal until the cycle completes and livestock is introduced.
Decision Framework: If X, Then Y
Before we get to the FAQ, here’s the clean decision logic for the two-week window:
If your skimmer is overflowing in the first 72 hours → lower the internal water level by 3–5mm, clean the cup daily, do not shut off the unit.
If your skimmer goes quiet around day 4–6 → raise the water level by 2mm increments, check air intake for blockage, wait 30 minutes between adjustments.
If skimmate is pale and watery after day 10 → water level is too high; lower it until foam thickens.
If the unit produces no foam and no bubbles after day 10 → inspect the impeller for debris, verify the air line is clear, confirm the pump is fully submerged at the manufacturer’s recommended depth.
If your tank is still cycling → run the skimmer at reduced output rather than turning it off.
Frequently Asked Questions
Is it normal for a new protein skimmer to overflow the collection cup in the first 24 hours?
Yes — this is one of the most consistent patterns across nano skimmer reviews regardless of brand or price tier. New plastic and acrylic surfaces haven’t developed the biofilm that stabilizes bubble behavior, and impellers haven’t yet seated to their running tolerances. The result is large, fast-rising bubbles that carry excessive water volume into the cup. Lower the internal water level and clean the cup frequently. The overflow should diminish significantly within 48–72 hours.
How long does a nano protein skimmer take to break in?
Most nano skimmers stabilize between seven and fourteen days, with the majority reaching consistent skimmate production by day ten. Variables that extend the window include lower water temperatures (slows biofilm development), very new tanks with low organic loads, and certain needle-wheel designs that take longer to seat. Published break-in estimates from manufacturers like Tunze and Reef Octopus both fall in this range, and long-run owner reports consistently validate it.
Why is my skimmer producing only bubbles and no skimmate?
Three common causes: (1) the internal water level is too low, so bubbles reach the collection cup before they’ve captured enough organic material — raise the water level incrementally; (2) the tank genuinely has a low organic load, particularly in the first week of a new cycle; (3) the air intake is partially blocked, producing large irregular bubbles that collapse before rising. Check each in that order.
How do I adjust the water level inside a protein skimmer?
The mechanism varies by design, but the principle is consistent: raising the outlet height or standpipe increases the water level inside the reaction chamber, producing wetter foam; lowering it drops the water level and thickens the foam. On most nano units, the adjustment is a twist-collar, a threaded standpipe, or a slide valve on the outlet pipe. Move in small increments — 2–4mm at a time — and wait at least 30 minutes before evaluating the effect.
Can I run a protein skimmer during the cycling phase of a new reef tank?
Yes, with reduced output. Running the skimmer at a lower water level (less aggressive skimmate production) during cycling provides some organic export without stripping the compounds that feed your establishing bacterial colony. Turning the skimmer completely off delays your break-in window and means you’ll restart the stabilization clock when livestock arrives. The practical middle ground — skimmer on, dialed down — is the approach most supported by experienced reef-keepers in long-form community discussions and consistent with guidance in Coral Magazine’s small-tank filtration coverage.