If you’ve just set up your first aquarium, here’s what a sump is in plain terms: it’s a second, hidden tank — usually tucked inside the cabinet beneath your display tank — that handles the messy work of filtration, equipment housing, and water volume expansion. Water drains from your display tank down into the sump through an overflow box (a device that skims surface water and routes it safely downward), travels through a series of compartments where biological media, a protein skimmer, and optional refugium plants do their job, and then a return pump pushes clean water back up into the display. The refugium portion — a separate lit chamber in the sump — typically grows macroalgae like Chaeto (Chaetomorpha) that absorbs excess nutrients the way a garden bed absorbs fertilizer runoff. If you’re sitting with a build plan and wondering whether to buy a pre-made sump or build your own, this guide is the one to read before you commit.
Building your own sump from an acrylic or glass tank isn’t just a cost play — it’s the only way to get chamber dimensions precisely matched to your overflow rate, your skimmer’s footprint, and your specific refugium goals. A DIY build that fits correctly outperforms a generic all-in-one sump nearly every time. Here’s how to design it right.
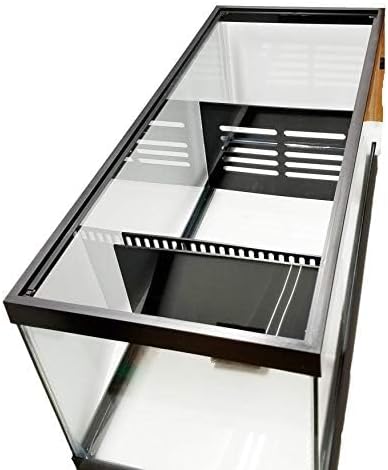
Chamber Layout: The Three-Zone Model That Actually Works
Almost every functional sump — whether commercial or DIY — follows a three-zone logic. Understand the logic first; the dimensions follow from there.
Zone 1: The Filter/Skimmer Chamber Water enters here from the overflow. This is where you place sock filters or a filter roller (mechanical filtration that catches solid waste before it breaks down into dissolved nutrients), and it’s where your protein skimmer — a device that uses rising bubbles to pull dissolved organic waste out of the water column before it can decay — sits. The rule most builders and resources like Advanced Aquarist’s sump design overview agree on: make this chamber deep enough that your skimmer’s body is fully submerged to its rated operating depth, and wide enough that skimmer turbulence doesn’t constantly overflow into the next zone.
Zone 2: The Refugium Chamber In the middle, isolated from direct skimmer turbulence by a baffle (a vertical divider the water flows under or over), your refugium sits. This chamber needs its own dedicated light — run on a reverse schedule from your display lights, so algae is photosynthesizing and consuming CO₂ when your display corals are in darkness, which helps buffer pH swings overnight. Chaeto is the most forgiving refugium macroalgae; it grows fast, doesn’t go sexual and crash like Caulerpa can, and tumbles freely in low flow.
Zone 3: The Return Chamber The final zone is where your return pump lives. Keep it sized generously — the bigger this reservoir, the more stable your water level and the less frequently you’ll top up freshwater for evaporation. A common mistake is making the return chamber too small; if your return pump runs dry during a power outage (because water siphons back from the display), you risk burning out the pump on restart.
Baffle Configuration: The Underflow/Overflow Sequence
To prevent microbubbles — tiny air bubbles generated by the skimmer or the falling overflow water — from being pumped back into your display, baffles are arranged in a specific sequence: over, under, over (sometimes called the bubble trap). Water flows over the first baffle wall, under the second, and over the third. This forces bubbles to rise and dissipate before water exits toward the return pump. Reef2Reef’s DIY Sump Build Megathread is probably the most thorough public reference for baffle spacing, with dozens of worked examples across different tank footprints.
Overflow Boxes: Matching Flow Rate to Build
The overflow is where most DIY builds get into trouble, because the overflow dictates everything downstream. There are three common configurations:
Drilled Internal Overflow (Herbie or Bean Animal Drain) If your display tank has drilled holes — either from the manufacturer or custom-drilled — you can run an internal overflow box with a standpipe. The Bean Animal system (named after the hobbyist who popularized it) uses three drain lines: a primary full siphon drain running silently, a secondary emergency drain, and a third open-channel drain as a fail-safe. Reef Builders’ overflow shootout analysis notes this is widely regarded as the quietest and most reliable method for tanks that can be drilled. The tradeoff: if you’re retrofitting an existing tank that isn’t pre-drilled, drilling tempered glass is not possible, and drilling standard glass carries meaningful crack risk without professional equipment.
HOB (Hang-on-Back) Overflow Box — Siphon Style For tanks that can’t be drilled, hang-on-back overflow boxes use a U-tube siphon to pull water from the display side and dump it into an external box that drains to the sump. Practical Fishkeeping’s sump explainer flags the core tradeoff clearly: siphon HOBs are easy to install but carry a real risk of siphon break during power outages, which means your return pump keeps pumping water to the display while drainage stops — a flood scenario. AquaLifter pumps or air-tube venturi systems can maintain siphon, but this introduces another failure point. If you go HOB, budget for a float switch in your sump that kills the return pump if water level drops below a set threshold.
Durso or Stockman Standpipe in a Drilled Overflow Simpler than Bean Animal and appropriate for lower-flow systems (typically under 600 GPH), a single standpipe with a vented cap reduces gurgling. If you’re building a sump for a 40-75 gallon freshwater planted system rather than a high-bioload reef, this is often sufficient and involves fewer components to troubleshoot.
By the Numbers: Sizing Your Overflow
| Display Tank Size | Target Turnover | Recommended Overflow Capacity | Suggested Drain Lines |
|---|---|---|---|
| 20–40 gallon | 3–5× tank volume/hr | 150–300 GPH rated | Single Durso standpipe |
| 55–75 gallon | 4–6× tank volume/hr | 400–700 GPH rated | Herbie dual-drain |
| 90–120 gallon | 5–8× tank volume/hr | 700–1,200 GPH rated | Bean Animal 3-drain |
| 150+ gallon reef | 6–10× tank volume/hr | 1,200–2,000+ GPH rated | Dual Bean Animal or commercial overflow |
These are conservative starting points. Reef systems with heavy protein skimmers and high-flow powerheads may push the upper end; lightly stocked freshwater systems can stay at the lower bound.
Return Pumps: The Math Behind Sizing
Return pump selection is where overthinking and underthinking both cause problems. The straightforward calculation:
Target return flow = overflow box rated capacity × 0.75
You want the return pump running at about 75% of the overflow’s maximum rated flow, giving you a buffer for head pressure loss (the friction and elevation cost of pushing water vertically from sump to display). For a Bean Animal overflow rated at 1,000 GPH, you’re targeting a return pump delivering roughly 750 GPH at head — meaning at your specific pipe diameter and vertical rise.
Head pressure matters significantly. A pump rated at 1,200 GPH in open air might deliver 700 GPH when pushing water 4 feet vertically through 3/4-inch pipe. Manufacturer head pressure curves (published on spec sheets) are non-negotiable reading before you buy. Owners across long-run Reef2Reef build threads consistently report that undersized return pumps are the single most common first-build mistake — the system runs, but skimmer performance suffers because water depth in the skimmer chamber fluctuates as the pump barely keeps up with the overflow.
DC vs AC Return Pumps DC (variable speed) return pumps — like those from Ecotech, Reef Octopus, or Waveline — allow you to dial flow rate down electronically without a ball valve, and many integrate with apex-style controllers for feed mode shutoffs. They cost roughly 30–60% more than equivalent AC pumps up front. For builds over 100 gallons or reef systems where automation is already in play, the premium is widely considered worthwhile based on aggregated owner reviews. For a 40-60 gallon freshwater sump build, a quality AC pump like a Sicce Syncra is a more straightforward value call.
Refugium Lighting: The Detail That Gets Skipped
Refugium lighting is frequently the last thing people spec and the first thing they regret cutting budget on. Chaeto requires meaningful PAR (photosynthetically active radiation — the wavelengths of light plants and algae actually use) to grow fast enough to provide real nutrient export. Most experienced builders cited in Coral Magazine’s refugium science feature recommend targeting 50–100 PAR at the algae surface as a minimum, with LED grow lights in the blue-red spectrum outperforming generic white LEDs for growth rate.
Avoid running your refugium light on the same schedule as your display — the reverse photoperiod is where the pH-buffering benefit lives. If your display runs 10 hours of light, run the refugium 12 hours during the display’s dark period, with a couple hours of overlap on each end.
Decision Framework: When to Build vs Buy
If you’re still deciding between DIY and a pre-made sump (Trigger Systems Crystal, Eshopps, Innovative Marine):
- Build DIY if: your tank footprint is non-standard, your skimmer is large, you want a refugium longer than 12 inches, or your cabinet dimensions require a custom fit. The materials cost for a well-built acrylic sump is $80–$200 for most hobbyist sizes.
- Buy pre-made if: your build timeline is tight, your tank is a standard size (75, 90, 120 gallon), and you’re running a mid-tier reef where the refugium is a secondary goal rather than the primary nutrient export strategy.
- The hybrid option: Buy a used or inexpensive glass tank in the right footprint, cut your own acrylic baffles, and silicone them in. This is the most common real-world approach for intermediate builders — lower fabrication risk than building a full acrylic sump from scratch, but still fully customizable for your chamber layout.
The most important single decision in any sump build isn’t the brand of return pump or the baffle height. It’s getting the overflow sizing correct before you buy anything else — because every other component is downstream of that number, literally and financially.